
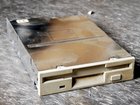
Floppy Disc Drive

Last updated on Sep 13, 2018
Views: 157
View statistics:
- Past 24 Hours:
- 0
- Past 7 Days:
- 0
- Past 30 Days:
- 3
- All Time:
- 157
Comments: 0
No one has left comments on this guide. Will you be first?
Go to guide commentsCompleted: 0 1
No one has marked this guide "completed." Will you be the first?
1 person has marked this guide "completed." It's you — great job!
Favorites: 0 1
No one has favorited (and subscribed to) this guide. Will you be the first?
1 person has favorited (and subscribed to) this guide — and that's you!
Introduction
Go to step 1 ↓Source: Dismantling Guide for IT Equipment, which was elaborated within the SRI project and financially supported by SECO and UNIDO, June 2015

World Resources Forum (WRF)
Mathias Schluep, St. Gallen / Switzerland

Dismantling and Recycling Centre (DRZ)
Markus Spitzbart, Vienna / Austria

Institute for Materials Science & Technology (Empa)
Fabian Blaser, St. Gallen / Switzerland
Health and Safety
Dismantling a floppy disk drive doesn’t include any harmful steps nor does the floppy disk drive contain any hazardous materials. Nonetheless workers should wear personal protection equipment like gloves, goggles, apron and robust shoes.
What you need


-
-
-
Open and remove the bottom and top cover (unscrew/pry open). It might be necessary to remove a small PWB to do so. Put the covers to the concerning material fraction.
-
-
-
Separate the remaining materials and components, amongst others the back cover, the motor, the floppy disk reader, the metal frame, etc. Assign them to the correct material fraction (e.g. aluminium, copper, ferrous metals, plastic, further PWBs, etc.).
-
-


