
PowerBook G3 Pismo Optical Drive Replacement

Last updated on Sep 18, 2016
Views: 41
View statistics:
- Past 24 Hours:
- 0
- Past 7 Days:
- 0
- Past 30 Days:
- 0
- All Time:
- 41
Comments: 0
No one has left comments on this guide. Will you be first?
Go to guide commentsCompleted: 0 1
No one has marked this guide "completed." Will you be the first?
1 person has marked this guide "completed." It's you — great job!
Favorites: 0 1
No one has favorited (and subscribed to) this guide. Will you be the first?
1 person has favorited (and subscribed to) this guide — and that's you!
Introduction
Go to step 1 ↓It's easy to change or upgrade the optical drive mechanism to a combo or SuperDrive.
What you need
-
-
-
Use the lever at the front of your laptop to remove the optical drive bay from the computer.
-
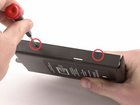
Remove the 2 Phillips #00 screws from the left side of the optical drive housing.
-
-
-
Grasp the black drive housing in one hand and the drive itself in the other, then slide the two apart.
-
-


To reassemble your device, follow these instructions in reverse order.

