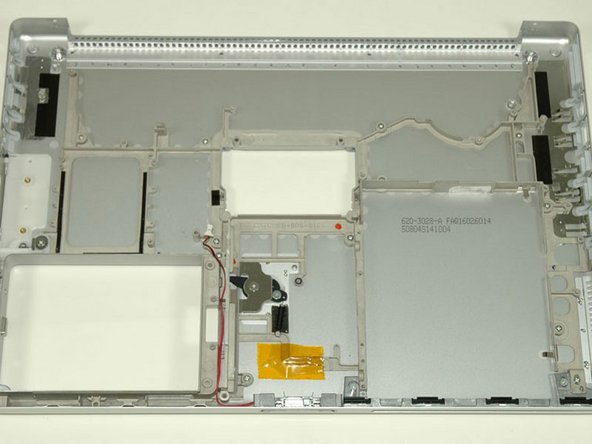
PowerBook G4 Aluminum 15" 1.5-1.67 GHz Lower Case Replacement

What you need

    1. PowerBook G4 Aluminum 15" 1.5-1.67 GHz Lower Case Replacement, PowerBook G4 Aluminum 15" 1.5-1.67 GHz Lower Case Replacement: step 1, image 1 of 1
      • Use a coin to turn the battery locking screw 90 degrees clockwise.

      • Lift the battery out of the computer.

      Add Comment

    2. PowerBook G4 Aluminum 15" 1.5-1.67 GHz Lower Case Replacement: step 2, image 1 of 1
      • Remove the four Phillips screws from the memory door.

      • Slide the memory door away from the memory compartment.

      Add Comment

    3. PowerBook G4 Aluminum 15" 1.5-1.67 GHz Lower Case Replacement: step 3, image 1 of 1
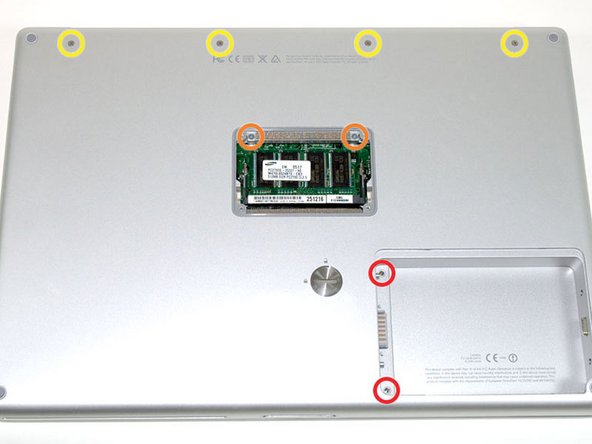
      • Remove the following 8 screws:

      • Two 3 mm Phillips in the battery compartment, on either side of the battery contacts.

      • Two 12 mm Phillips on either side of the memory compartment.

      • Four 16 mm Phillips along the hinge.

      Add Comment

    4. PowerBook G4 Aluminum 15" 1.5-1.67 GHz Lower Case Replacement: step 4, image 1 of 1
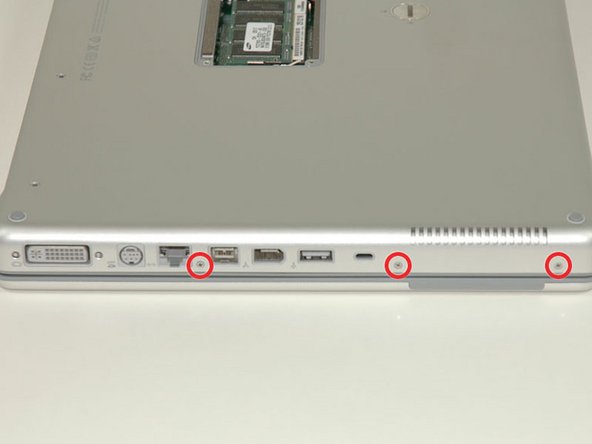
      • Rotate the computer 90 degrees clockwise, so that the power receptacle faces you.

      • Remove the three 3 mm Phillips screws.

      • When replacing these screws, you must place each screw in the correct order. Begin by installing the screw closest to the display hinge, and go out from there.

      Add Comment

    5. PowerBook G4 Aluminum 15" 1.5-1.67 GHz Lower Case Replacement: step 5, image 1 of 1
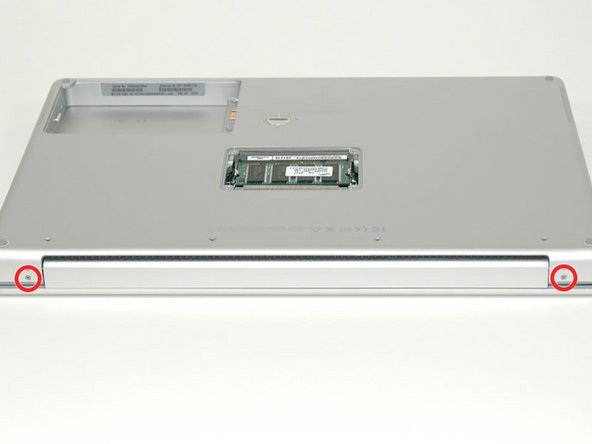
      • Turn the computer 90 degrees clockwise so that the hinge faces you.

      • Remove the bottom 5 mm Phillips screw on either side of the hinge (two total).

      Add Comment

    6. PowerBook G4 Aluminum 15" 1.5-1.67 GHz Lower Case Replacement: step 6, image 1 of 1
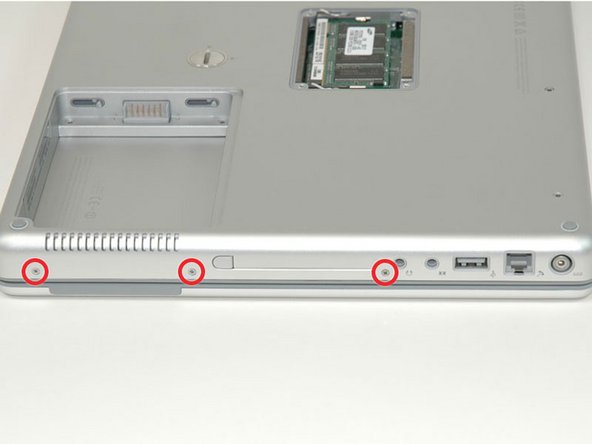
      • Rotate the computer 90 degrees clockwise, so that the ports face you.

      • Remove the three 3 mm Phillips screws.

      • When replacing these screws, you must place each screw in the correct order. Begin by installing the screw closest to the display hinge, and go out from there.

      Add Comment

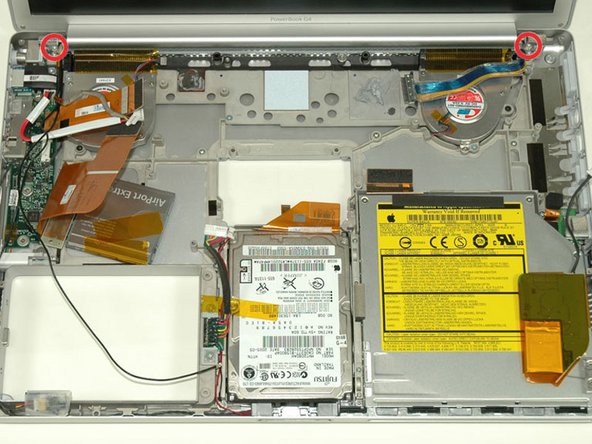
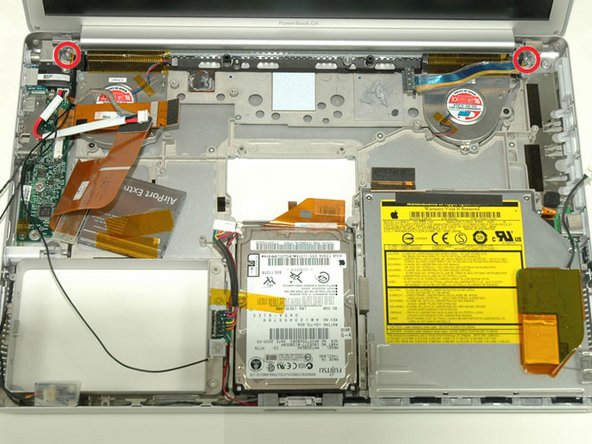
    7. PowerBook G4 Aluminum 15" 1.5-1.67 GHz Lower Case Replacement: step 7, image 1 of 1
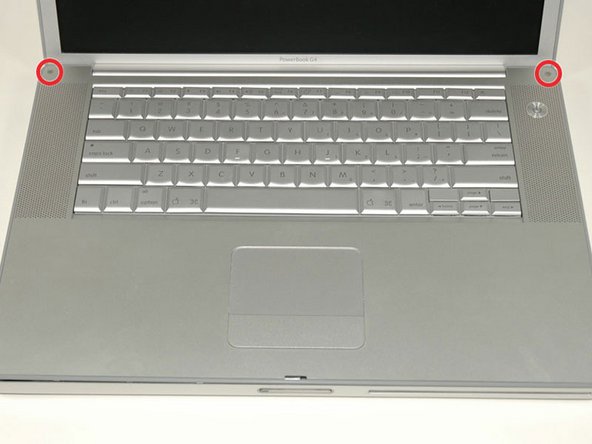
      • Turn the computer over and open the display.

      • Remove the two 1.5 mm hex screws in either corner, next to the display (a T6 Torx driver will work, but repeated use will strip the screws).

      Add Comment

    8. PowerBook G4 Aluminum 15" 1.5-1.67 GHz Lower Case Replacement: step 8, image 1 of 1
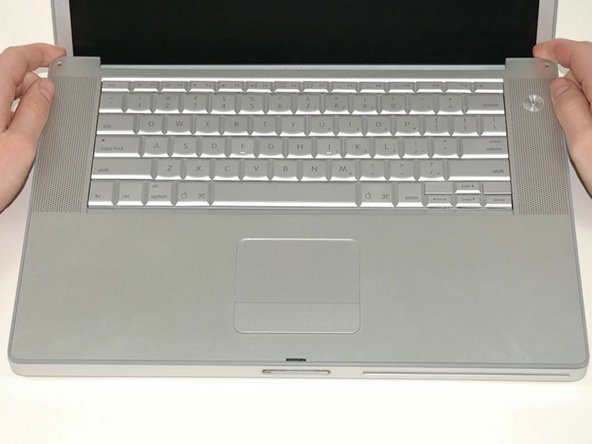
      • Grasp the back corners of the upper case and pull up. Do not pull the upper case off yet; you still need to disconnect the keyboard and trackpad cable.

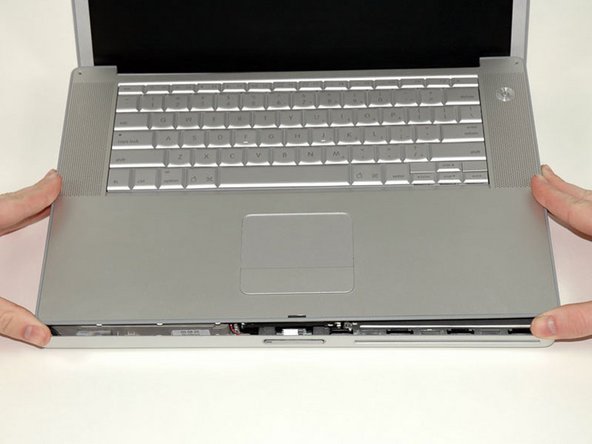
      • Lift the back of the case up and work your fingers along the sides, freeing the case as you go. Once you have freed the sides, you may need to rock the case up and down to free the front of the upper case.

      Add Comment

    9. PowerBook G4 Aluminum 15" 1.5-1.67 GHz Lower Case Replacement: step 9, image 1 of 1
      • Rotate the upper case up and toward the screen, so that the upper case rests against it.

      Add Comment

    10. PowerBook G4 Aluminum 15" 1.5-1.67 GHz Lower Case Replacement: step 10, image 1 of 1
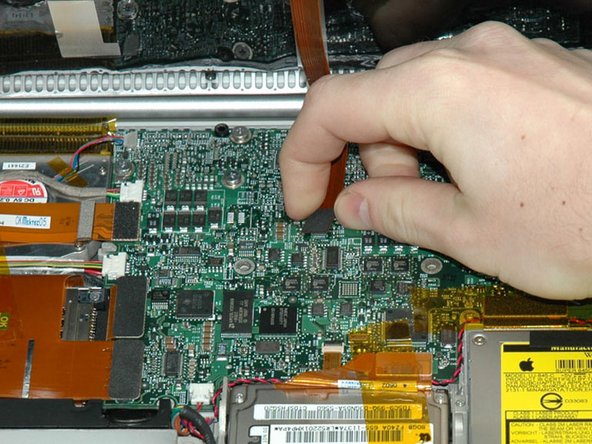
      • Remove the orange tape securing the trackpad ribbon to the logic board.

      • Disconnect the trackpad ribbon from the logic board.

      • Remove the upper case from the computer.

      Add Comment

    11. PowerBook G4 Aluminum 15" 1.5-1.67 GHz Lower Case Replacement: step 11, image 1 of 1
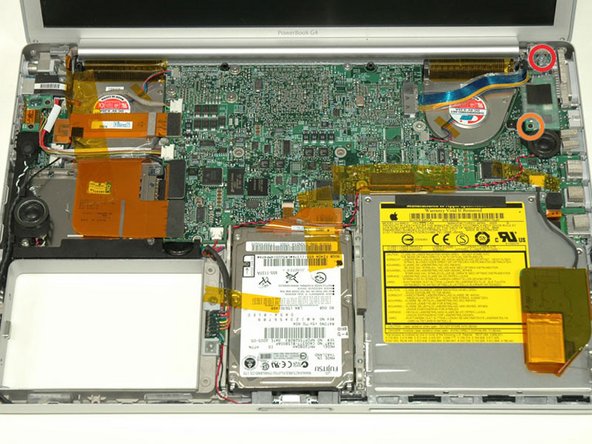
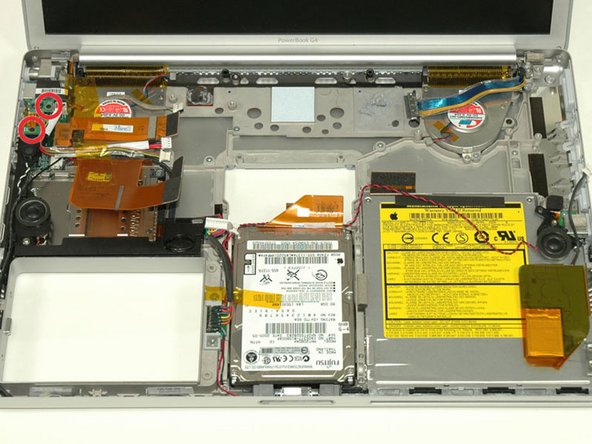
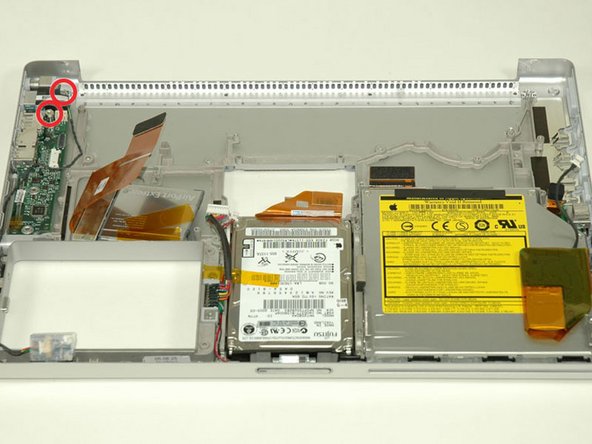
      • Remove the 9.5 mm silver Phillips screw from the top of the right ambient light sensor board.

      • Remove the small 3 mm black Phillips screw from the bottom of the board.

      Add Comment

    12. PowerBook G4 Aluminum 15" 1.5-1.67 GHz Lower Case Replacement: step 12, image 1 of 1
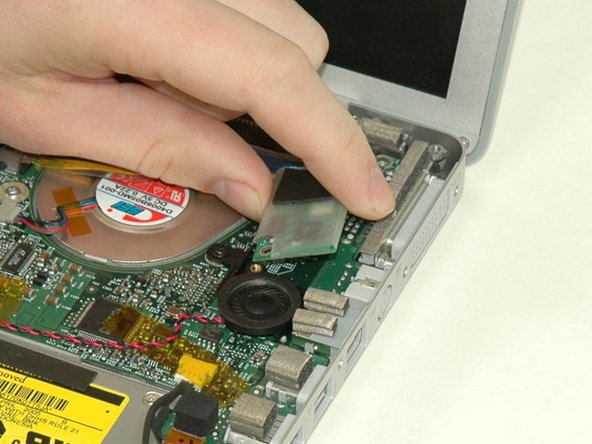
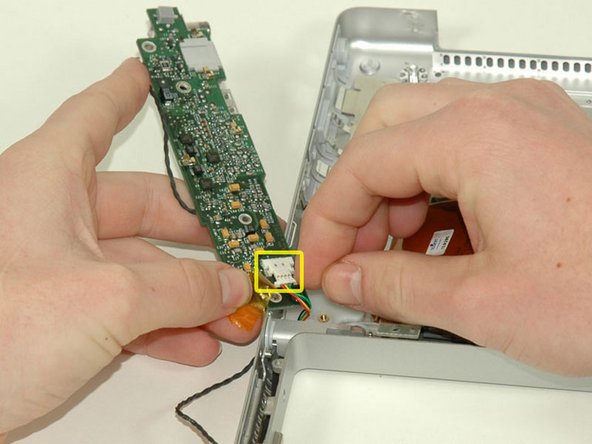
      • Lift the right ambient light sensor board from the computer.

      Add Comment

    13. PowerBook G4 Aluminum 15" 1.5-1.67 GHz Lower Case Replacement: step 13, image 1 of 1
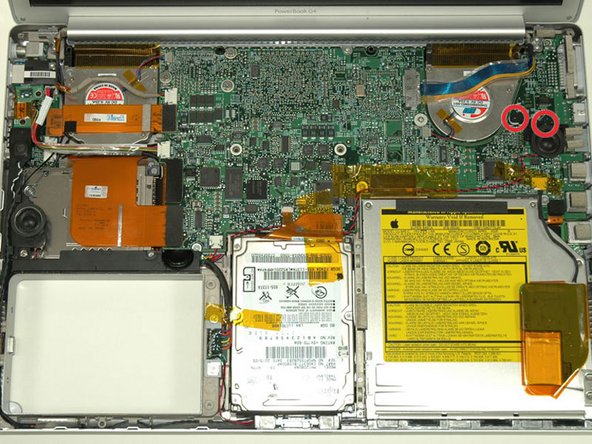
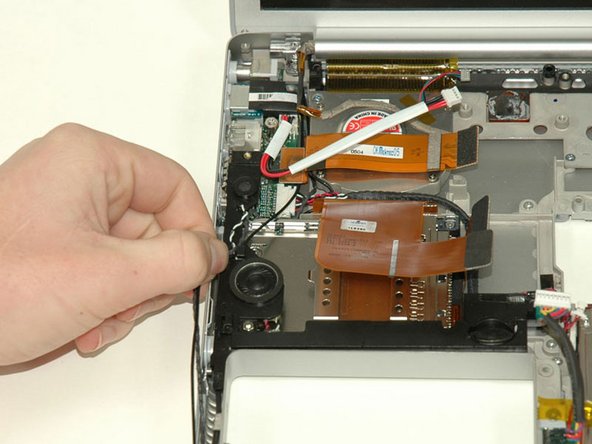
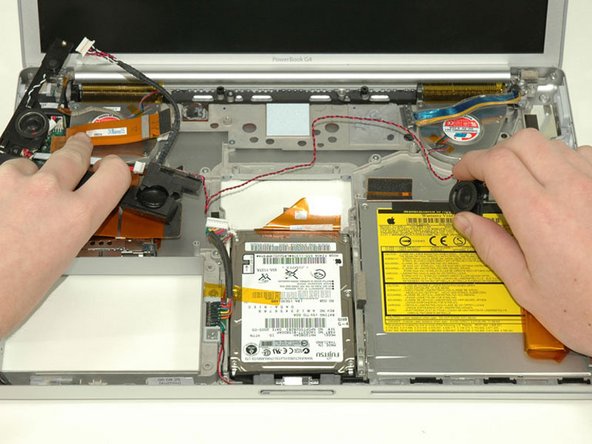
      • Remove the two black Phillips screws from the right speaker.

      • Lift the speaker away from the logic board and place it aside

      Add Comment

    14. PowerBook G4 Aluminum 15" 1.5-1.67 GHz Lower Case Replacement: step 14, image 1 of 1
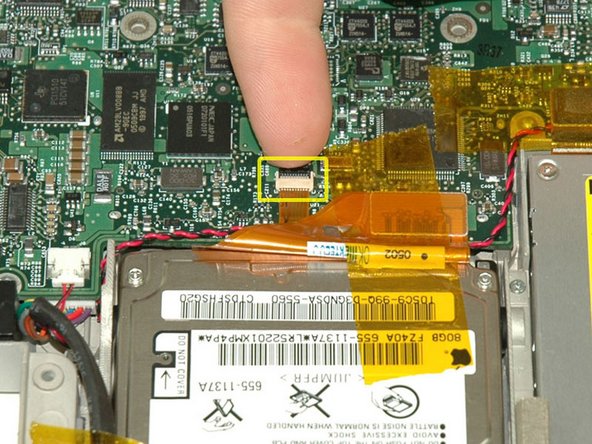
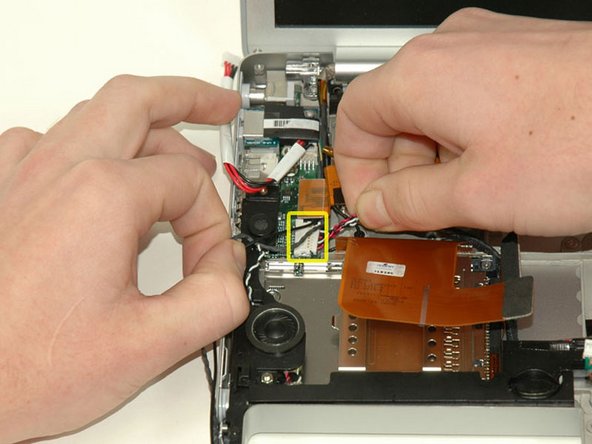
      • Use your fingernail to flip up the black plastic flap locking the modem cable in place.

      • Slide the modem cable from its connector.

      Add Comment

    15. PowerBook G4 Aluminum 15" 1.5-1.67 GHz Lower Case Replacement: step 15, image 1 of 1
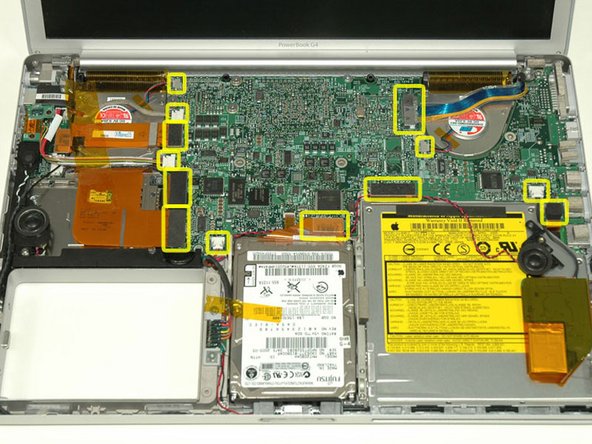
      • Disconnect the 13 indicated cables, removing tape as necessary.

      • When re-installing the board, make sure the two small connectors at the right hand side are above the board before inserting the screws.

      Add Comment

    16. PowerBook G4 Aluminum 15" 1.5-1.67 GHz Lower Case Replacement: step 16, image 1 of 1
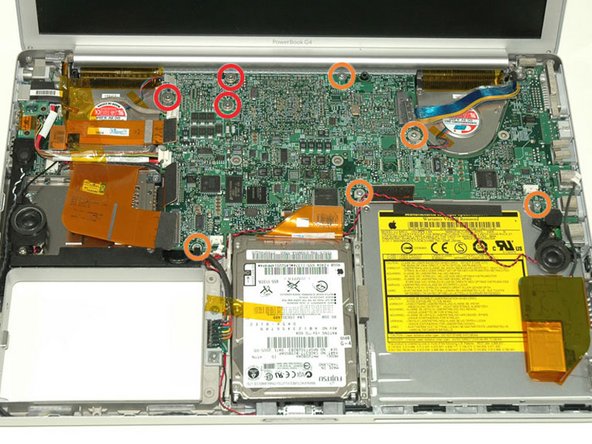
      • Remove the following 8 Phillips screws from the logic board:

      • Three 6.5 mm in the upper left corner.

      • Five 4.5 mm around the edges.

      Add Comment

    17. PowerBook G4 Aluminum 15" 1.5-1.67 GHz Lower Case Replacement: step 17, image 1 of 1
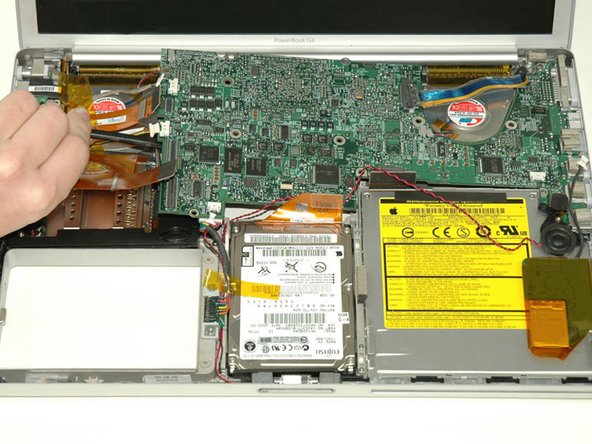
      • Two cables still connect to the logic board and must be removed before pulling the board entirely out of the computer.

      • Use a spudger to gently (very gently) pry up the left side of the logic board.

      • If the logic board does not immediately come free, it may be necessary to soften the thermal paste between the logic board and heat sink. You can soften the thermal compound using a hairdryer. Move the hairdryer back and forth between the two fans about one inch above the logic board for one minute. At this point, the logic board should now come free easily.

      Add Comment

    18. PowerBook G4 Aluminum 15" 1.5-1.67 GHz Lower Case Replacement: step 18, image 1 of 1
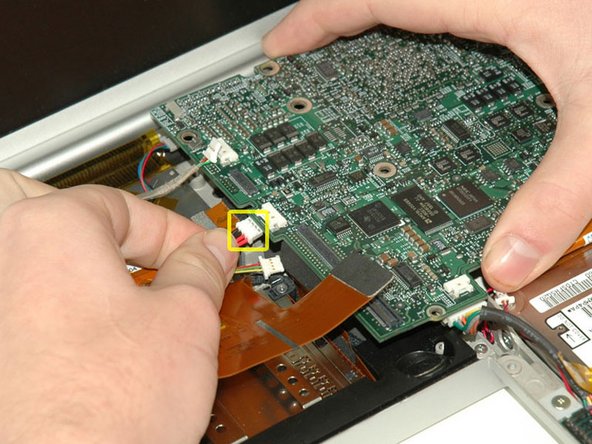
      • Disconnect the DC-In connector from the left side of the logic board.

      Add Comment

    19. PowerBook G4 Aluminum 15" 1.5-1.67 GHz Lower Case Replacement: step 19, image 1 of 1
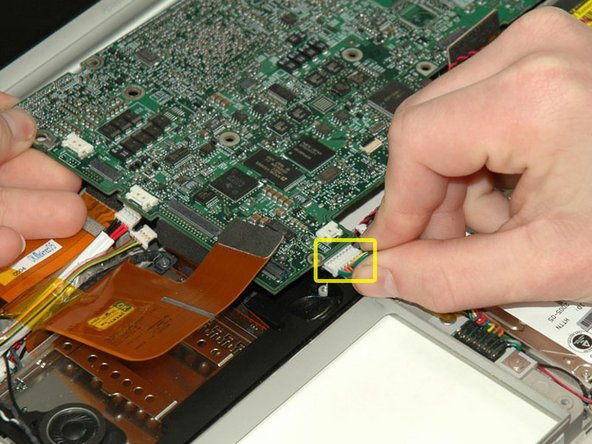
      • Disconnect the battery cable from the front, left corner of the logic board.

      Add Comment

    20. PowerBook G4 Aluminum 15" 1.5-1.67 GHz Lower Case Replacement: step 20, image 1 of 1
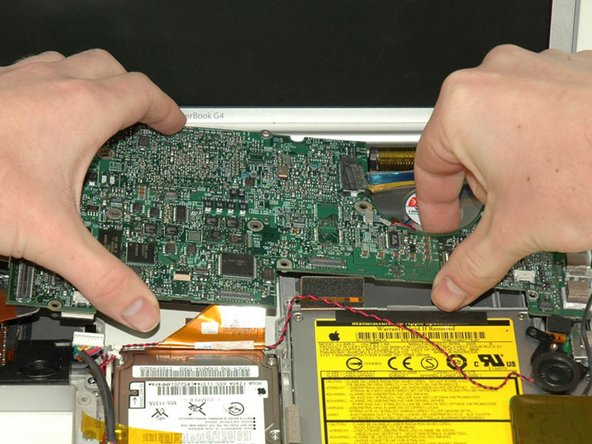
      • Grasp the logic board at the left edge with one hand and at the thinnest section with the other hand. Lift the left edge of the board up to approximately a 30 degree angle (if you don't have your protractor handy, just lift until the DVI port clears the right hinge).

      • Once the logic board clears the ports, slide it out to the left.

      Add Comment

    21. PowerBook G4 Aluminum 15" 1.5-1.67 GHz Lower Case Replacement: step 21, image 1 of 1
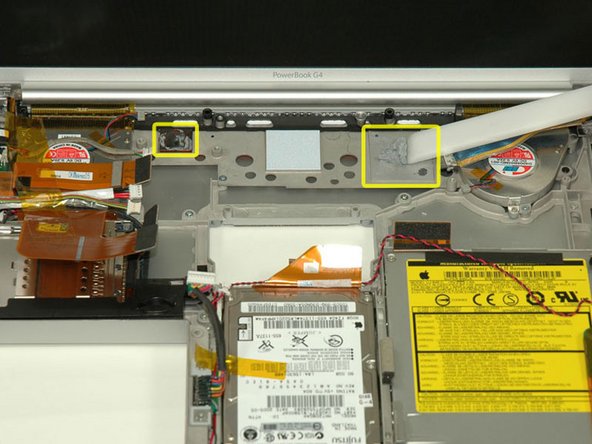
      • Important: when you reinstall a logic board, you'll need to replace the thermal paste that goes between the processor on the logic board and the heat sink. Failure to remove the old paste and apply a new layer can cause the computer to overheat and sustain damage.

      • To properly reassemble your PowerBook, you'll have to clean off and replace the old thermal compound. Use our Applying Thermal Paste Guide to prepare the processor and heat sink surfaces.

      Add Comment

    22. PowerBook G4 Aluminum 15" 1.5-1.67 GHz Lower Case Replacement: step 22, image 1 of 1
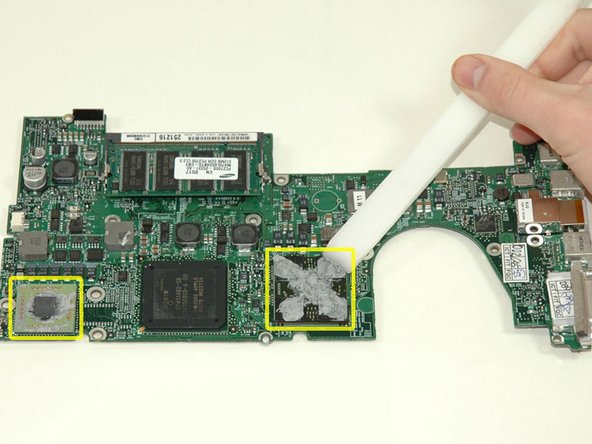
      • Use a firm plastic edge to scrape the thermal material off the processor.

      • When replacing the logic board, make sure all cables are routed around and above - not under - it, and to connect the two cables that do go beneath before pushing the board into place.
      • Place the logic board back in the computer, trying not to move it around once the processor has come into contact with the newly-applied thermal paste.

      Add Comment

    23. PowerBook G4 Aluminum 15" 1.5-1.67 GHz Lower Case Replacement: step 23, image 1 of 1
      • Remove the two 3 mm black Phillips screws from the left ambient light sensor board.

      • Lift the left ambient light sensor board out of the computer, removing tape as necessary.

      Add Comment

    24. PowerBook G4 Aluminum 15" 1.5-1.67 GHz Lower Case Replacement: step 24, image 1 of 1
      • Deroute the Bluetooth and RJ-11 cables from around the left side of the speaker.

      Add Comment

    25. PowerBook G4 Aluminum 15" 1.5-1.67 GHz Lower Case Replacement: step 25, image 1 of 1
      • Disconnect the speaker cable from the DC/Sound card.

      Add Comment

    26. PowerBook G4 Aluminum 15" 1.5-1.67 GHz Lower Case Replacement: step 26, image 1 of 1
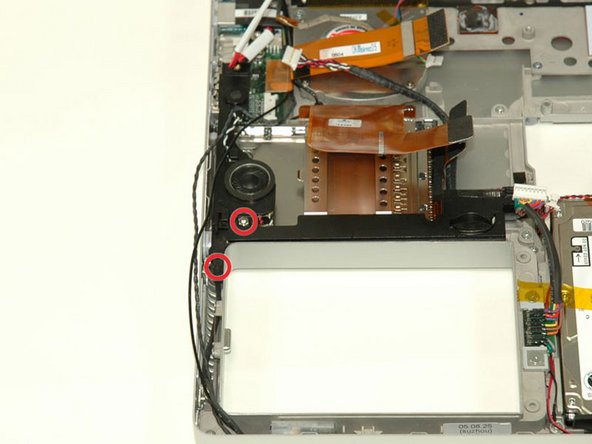
      • Remove the 4 mm hex nut from below the left speaker.

      • Remove the 3 mm black Phillips screw from bottom left corner of the speaker assembly, to the left of the battery compartment.

      Add Comment

    27. PowerBook G4 Aluminum 15" 1.5-1.67 GHz Lower Case Replacement: step 27, image 1 of 1
      • Lift the speaker assembly (including the right speaker) out of the computer.

      Add Comment

    28. PowerBook G4 Aluminum 15" 1.5-1.67 GHz Lower Case Replacement: step 28, image 1 of 1
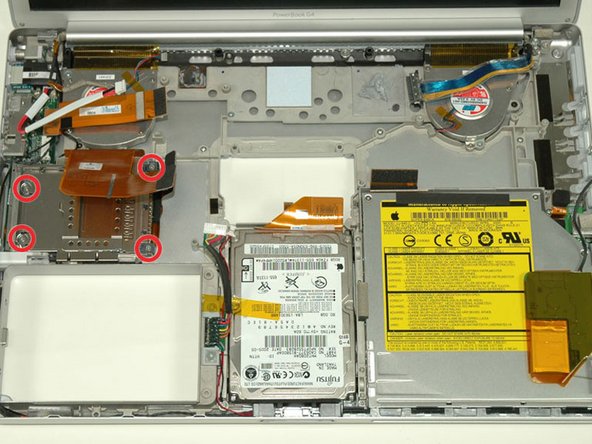
      • Remove the two 4.2 mm silver Phillips screws from the left corners of the PC card cage.

      • Next the two 6.8 mm shouldered screws go on the right side of the card cage.

      Add Comment

    29. PowerBook G4 Aluminum 15" 1.5-1.67 GHz Lower Case Replacement: step 29, image 1 of 1
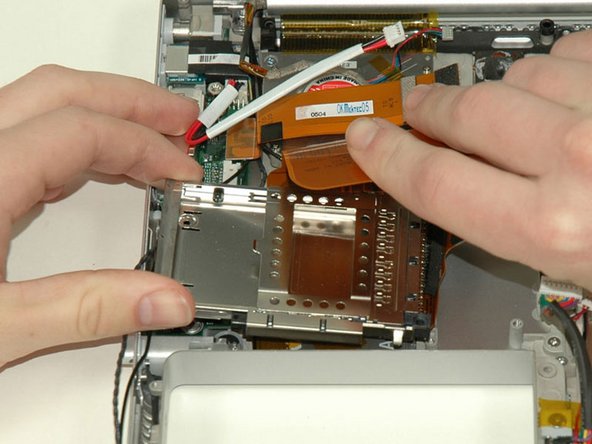
      • Lift the PC card cage up and remove it from the computer.

      • When replacing the PC card cage, make sure you attach it to the post on the metal eject button.

      Add Comment

    30. PowerBook G4 Aluminum 15" 1.5-1.67 GHz Lower Case Replacement: step 30, image 1 of 1
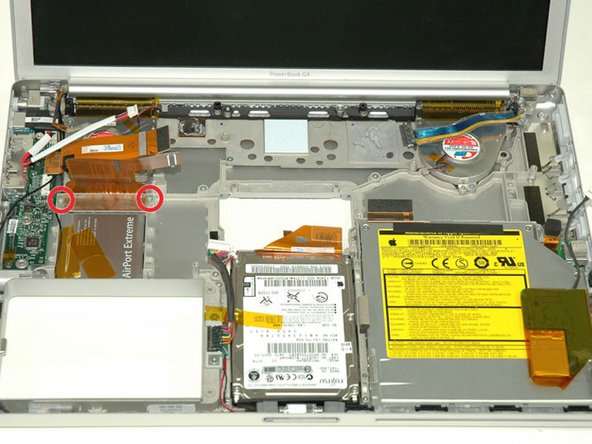
      • Remove the two 4.2 mm silver Phillips screws from either side of the large orange Airport ribbon.

      Add Comment

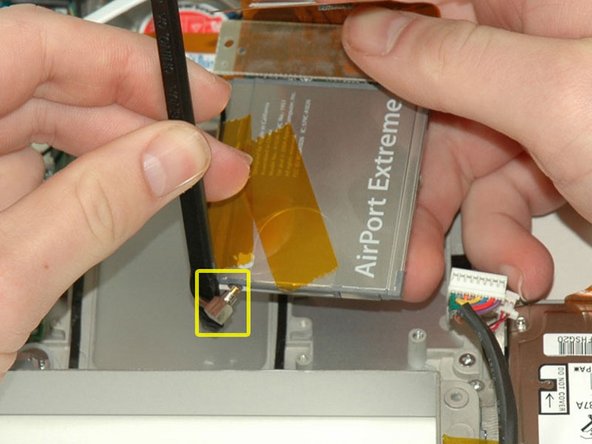
    31. PowerBook G4 Aluminum 15" 1.5-1.67 GHz Lower Case Replacement: step 31, image 1 of 1
      • Lift the Airport card out of the computer and slide a spudger between the card and the antenna connector to disconnect the cable from the card.

      • Deroute the antenna cable from the side of the card, removing tape as necessary.

      • You don't need to remove the Airport card entirely. We're just trying to free up the Airport antenna cable.

      Add Comment

    32. PowerBook G4 Aluminum 15" 1.5-1.67 GHz Lower Case Replacement: step 32, image 1 of 1
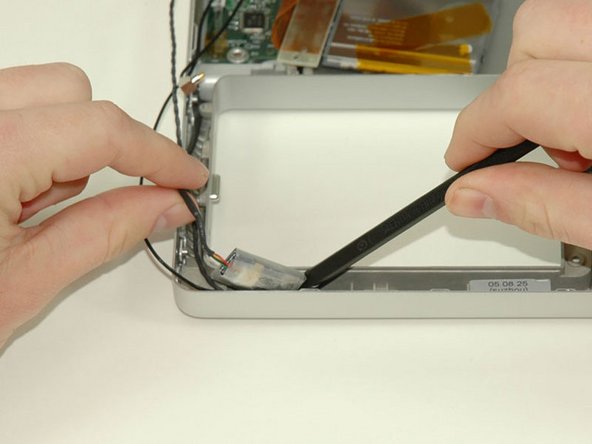
      • Using a spudger, pry up the Bluetooth board from the cavity in front of the battery compartment.

      Add Comment

    33. PowerBook G4 Aluminum 15" 1.5-1.67 GHz Lower Case Replacement: step 33, image 1 of 1
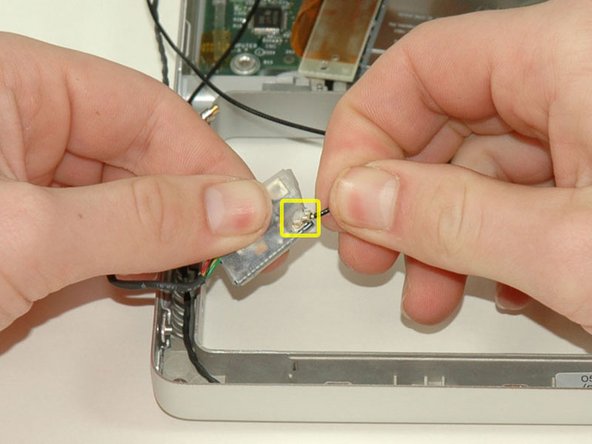
      • Disconnect the Bluetooth antenna cable from the Bluetooth board.

      Add Comment

    34. PowerBook G4 Aluminum 15" 1.5-1.67 GHz Lower Case Replacement: step 34, image 1 of 1
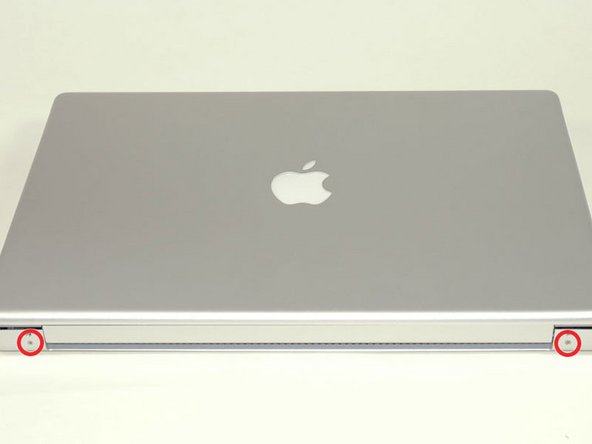
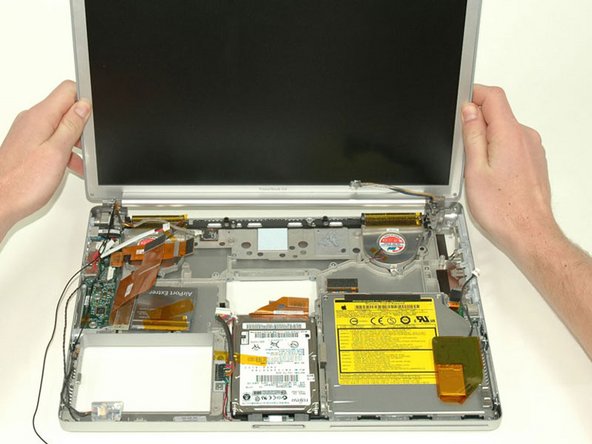
      • Close the display and turn the hinge side of the computer to face you.

      • Remove the remaining Phillips screw on either side of the hinge (two screws total).

      Add Comment

    35. PowerBook G4 Aluminum 15" 1.5-1.67 GHz Lower Case Replacement: step 35, image 1 of 1
      • Open the display and turn the computer so the screen faces you.

      • Remove the 10 mm T8 Torx screw closer to the display on either side of the hinge (two screws total).

      • When replacing the display, make sure that the right screw pins down the ground loop from the display data cable.

      Add Comment

    36. PowerBook G4 Aluminum 15" 1.5-1.67 GHz Lower Case Replacement: step 36, image 1 of 1
      • Be sure to support the display with one hand while removing the final two screws.

      • Remove the longer 13 mm shouldered T8 Torx screw remaining on either hinge (two screws total).

      Add Comment

    37. PowerBook G4 Aluminum 15" 1.5-1.67 GHz Lower Case Replacement: step 37, image 1 of 1
      • Lift the display off.

      Add Comment

    38. PowerBook G4 Aluminum 15" 1.5-1.67 GHz Lower Case Replacement: step 38, image 1 of 1
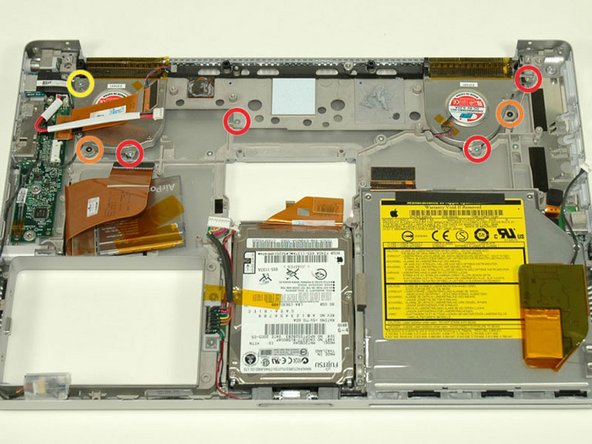
      • Remove the following 7 Phillips screws from the heat sink:

      • Four 4 mm silver screws.

      • Two 5 mm black screws.

      • One 9 mm silver screw in the upper left corner of the left fan.

      Add Comment

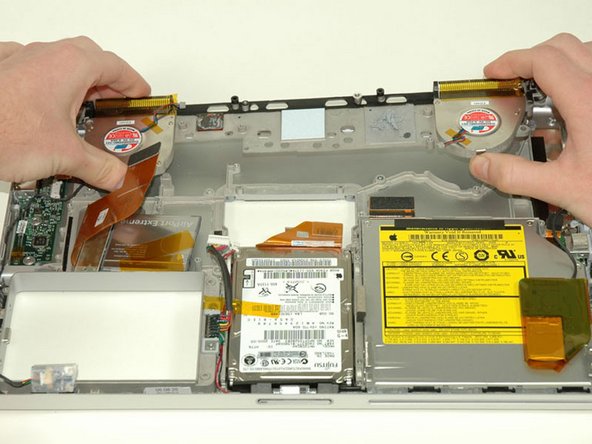
    39. PowerBook G4 Aluminum 15" 1.5-1.67 GHz Lower Case Replacement: step 39, image 1 of 1
      • Remove the heat sink from the case, minding the left corner, as it tends to catch in the case (the fans will come out with the heat sink).

      Add Comment

    40. PowerBook G4 Aluminum 15" 1.5-1.67 GHz Lower Case Replacement: step 40, image 1 of 1
      • Disconnect the 4-pin power cable and orange ribbon cable from the DC/Sound card.

      Add Comment

    41. PowerBook G4 Aluminum 15" 1.5-1.67 GHz Lower Case Replacement: step 41, image 1 of 1
      • Remove the T8 Torx screw from the RJ-11 board.

      • Remove the 5 mm standoff that secures the DC/Sound card to the lower case using a nut driver or pliers.

      Add Comment

    42. PowerBook G4 Aluminum 15" 1.5-1.67 GHz Lower Case Replacement: step 42, image 1 of 1
      • Do not pull the DC/Sound card out entirely. You will be disconnecting the Bluetooth cable in the next step.

      • Lift the DC/Sound card out of the computer and turn it over.

      • Disconnect the Bluetooth cable from the DC/Sound card, removing tape as necessary.

      Add Comment

    43. PowerBook G4 Aluminum 15" 1.5-1.67 GHz Lower Case Replacement: step 43, image 1 of 1
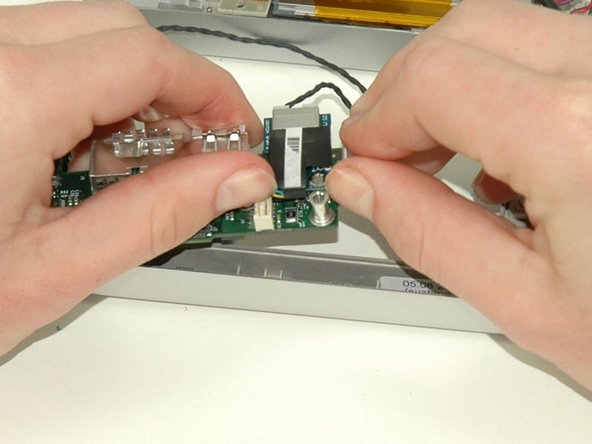
      • Use your thumbs to slide the RJ-11 board away from the sound card in the same direction you would disconnect a cable. This is your chance to get out some aggression, as the board will most likely be very tight and requires a good deal of force to remove. Don't get carried away though - don't hold onto the power connector and don't put too much actual force on the card itself.

      • The DC/Sound card should now be free.

      Add Comment

    44. PowerBook G4 Aluminum 15" 1.5-1.67 GHz Lower Case Replacement: step 44, image 1 of 1
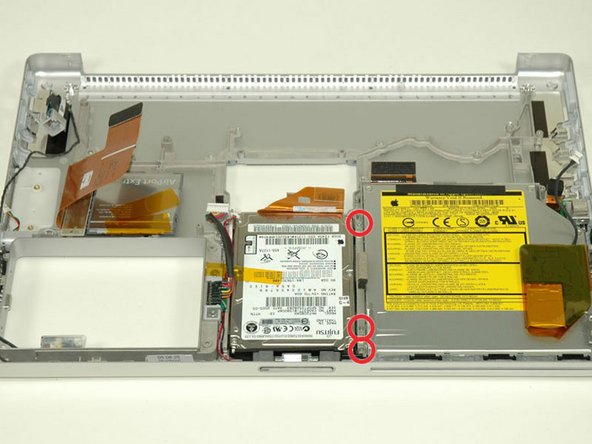
      • Remove the three long silver Phillips screws from the retaining bracket on the left side of the optical drive.

      • Remove the retaining bracket.

      Add Comment

    45. PowerBook G4 Aluminum 15" 1.5-1.67 GHz Lower Case Replacement: step 45, image 1 of 1
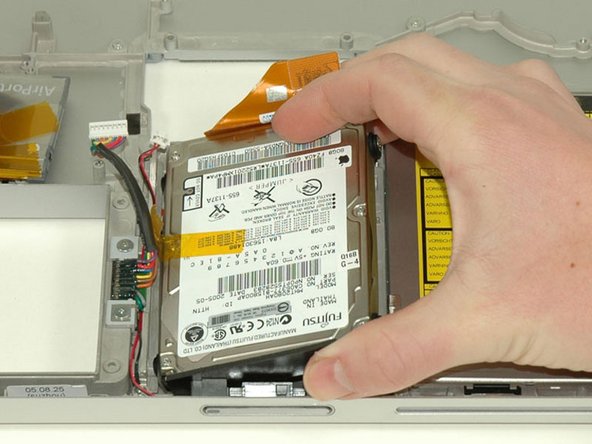
      • Lift the hard drive up from the right side and remove it from the computer.

      Add Comment

    46. PowerBook G4 Aluminum 15" 1.5-1.67 GHz Lower Case Replacement: step 46, image 1 of 1
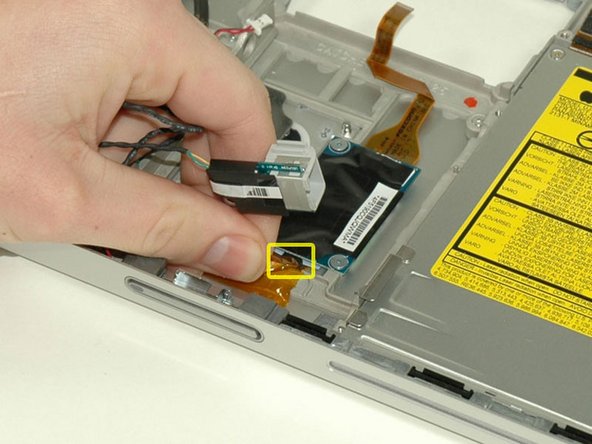
      • Deroute the RJ-11 cable from along the front of the computer and lift the part out of the computer.

      • Disconnect the RJ-11 cable from the bottom of the modem.

      Add Comment

    47. PowerBook G4 Aluminum 15" 1.5-1.67 GHz Lower Case Replacement: step 47, image 1 of 1
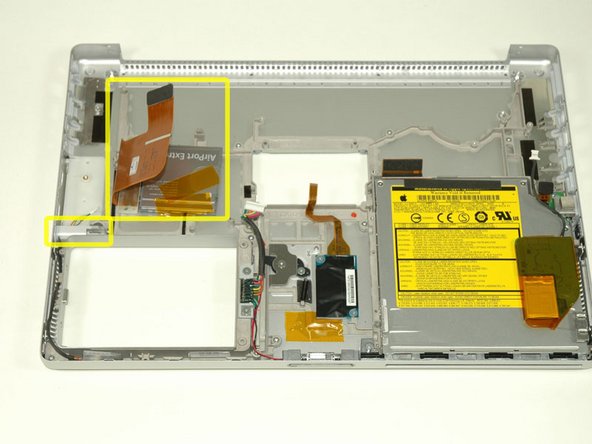
      • Before going on, remove the loose parts left in the computer. The Airport card and PC card eject button should both be free. Just remove these parts from the computer and set them aside.

      Add Comment

    48. PowerBook G4 Aluminum 15" 1.5-1.67 GHz Lower Case Replacement: step 48, image 1 of 1
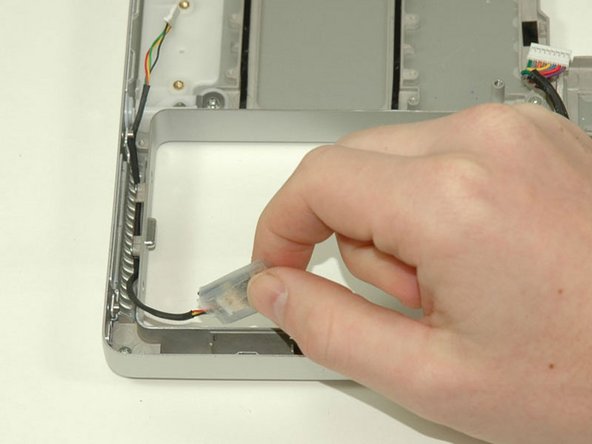
      • The Bluetooth board and cable should also be free, wedged in the cavity next to the battery compartment. Remove these and set them aside.

      Add Comment

    49. PowerBook G4 Aluminum 15" 1.5-1.67 GHz Lower Case Replacement: step 49, image 1 of 1
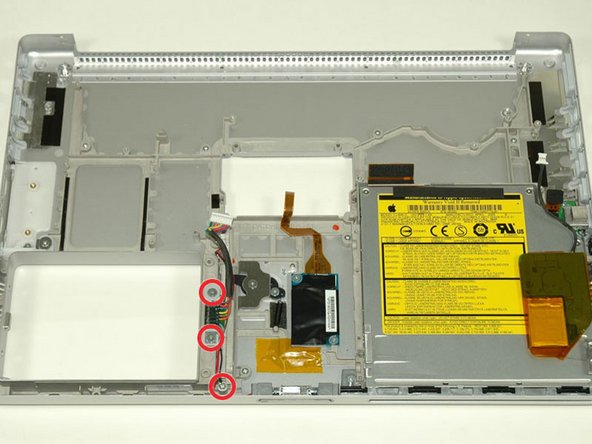
      • Remove the two silver Phillips screws from the battery connector.

      • Remove a third Phillips screw near the front of the computer that pins down a ground loop.

      • Remove the battery connector.

      Add Comment

    50. PowerBook G4 Aluminum 15" 1.5-1.67 GHz Lower Case Replacement: step 50, image 1 of 1
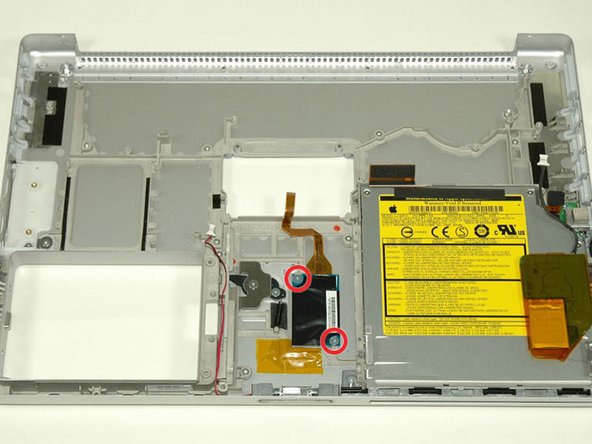
      • Remove the two Phillips screws from the modem.

      • Remove the modem.

      Add Comment

    51. PowerBook G4 Aluminum 15" 1.5-1.67 GHz Lower Case Replacement: step 51, image 1 of 1
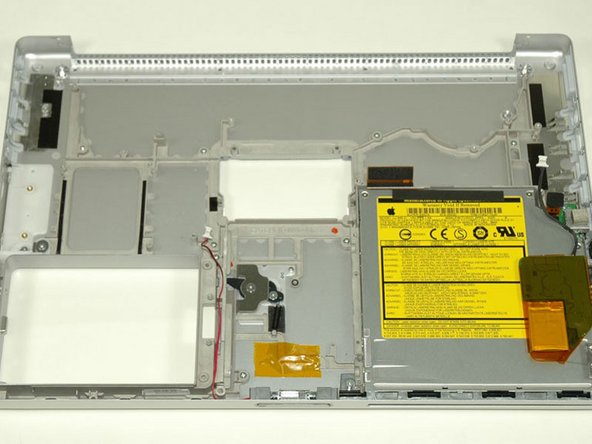
      • Remove the single black Phillips screw from the front right corner of the optical drive.

      • Remove the optical drive and attached PRAM battery.

      Add Comment

    52. PowerBook G4 Aluminum 15" 1.5-1.67 GHz Lower Case Replacement: step 52, image 1 of 1
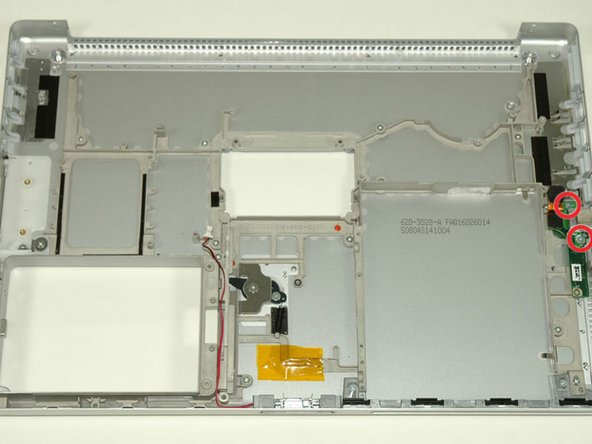
      • Remove the two Phillips screws from the right USB board.

      • Remove the right USB board.

      Add Comment

    53. PowerBook G4 Aluminum 15" 1.5-1.67 GHz Lower Case Replacement: step 53, image 1 of 1
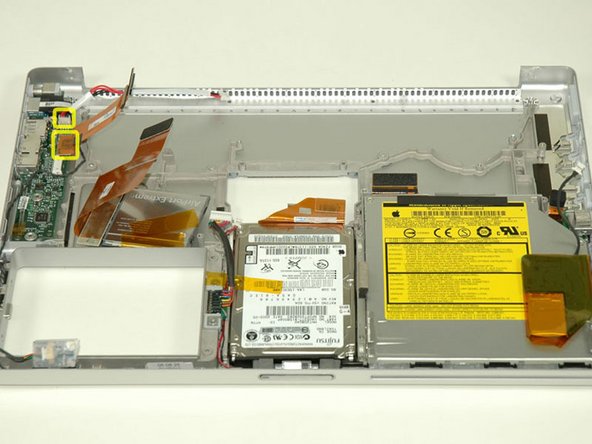
      • The lower case should now be clear of all major components except for the sleep light.

      Add Comment

Conclusion

To reassemble your device, follow these instructions in reverse order.

Cancel: I did not complete this guide.

System

Member since: 09/24/09

2,562 Guides authored

0 Guide Comments

Add Comment

View Statistics:

Past 24 Hours: 0

Past 7 Days: 0

Past 30 Days: 0

All Time: 13