
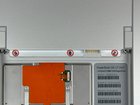
PowerBook G4 Aluminum 17" 1.67 GHz (High-Res) Memory Door Replacement

Last updated on Sep 18, 2016
Views: 31
View statistics:
- Past 24 Hours:
- 0
- Past 7 Days:
- 0
- Past 30 Days:
- 0
- All Time:
- 31
Comments: 0
No one has left comments on this guide. Will you be first?
Go to guide commentsCompleted: 0 1
No one has marked this guide "completed." Will you be the first?
1 person has marked this guide "completed." It's you — great job!
Favorites: 0 1
No one has favorited (and subscribed to) this guide. Will you be the first?
1 person has favorited (and subscribed to) this guide — and that's you!
Time Required: No estimate
Difficulty: Moderate
Introduction
Go to step 1 ↓Remove your memory door to access the RAM chips.
What you need
-
-
-
Use your thumbs to push the two battery retaining tabs away from the battery.
-
The battery should pop up enough to rotate it toward yourself and lift it out of the lower case.
-
-


Conclusion
To reassemble your device, follow these instructions in reverse order.

