
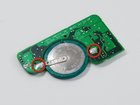
PowerBook G4 PRAM Battery Replacement

Last updated on Sep 18, 2016
Views: 25
View statistics:
- Past 24 Hours:
- 0
- Past 7 Days:
- 0
- Past 30 Days:
- 0
- All Time:
- 25
Comments: 0
No one has left comments on this guide. Will you be first?
Go to guide commentsCompleted: 0 1
No one has marked this guide "completed." Will you be the first?
1 person has marked this guide "completed." It's you — great job!
Favorites: 0 1
No one has favorited (and subscribed to) this guide. Will you be the first?
1 person has favorited (and subscribed to) this guide — and that's you!
Introduction
Go to step 1 ↓PRAM batteries on the G4 PowerBooks are an aging part causing errors with the date and time among other things. You can replace the battery with just a few simple steps.
What you need
Parts
Tools
-
-
-
You will need to remove the PRAM battery assembly from your computer. Refer to our G4 PowerBook guides for how to do that specifically for your computer.
-
Make note of where the positive (+) side connects so to eliminate confusion when you try to install the new battery.
-
There are only two locations where you will need to solder.
-
-
-
With a soldering iron, place the tip on the first joint and hold it there until the solder liquefies allowing you to pull the battery's terminal away.
-
Do the same for the second, soldered joint.
-
-
-
With the old battery free from the assembly, you can now install your new one.
-
Again, make note of where the positive (+) side is installed.
-
-
-
Place the battery terminal directly on the remaining solder joint.
-
Using the soldering iron, apply pressure until the solder liquefies and joins with the battery terminal
-
Do the same thing for the other soldering joint and you are done.
-
-


You can now install the PRAM assembly back in the computer.

