
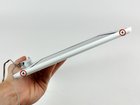
iBook G4 14" 933 MHz-1.33 GHz Rear Display Bezel Replacement

Last updated on Sep 17, 2016
Views: 23
View statistics:
- Past 24 Hours:
- 0
- Past 7 Days:
- 0
- Past 30 Days:
- 0
- All Time:
- 23
Comments: 0
No one has left comments on this guide. Will you be first?
Go to guide commentsCompleted: 0 1
No one has marked this guide "completed." Will you be the first?
1 person has marked this guide "completed." It's you — great job!
Favorites: 0 1
No one has favorited (and subscribed to) this guide. Will you be the first?
1 person has favorited (and subscribed to) this guide — and that's you!
 Prerequisite Only
This guide is only used as a prerequisite for other guides and is not a complete or useful guide when viewed independently.
Introduction
Go to step 1 ↓This guide is an internal prerequisite that should remain unpublished.
-
-
-
Use a 1.5 mm hex screwdriver to remove the two hex screws on either side of the display (four screws total).
-
-
-
Insert the flat end of a spudger into the gap between the front and rear bezels.
-
Rotate your spudger until it is parallel to the front face of the display.
-
Run the spudger around the perimeter of the display to separate the rear bezel from its retaining clips.
-
-


To reassemble your device, follow these instructions in reverse order.

